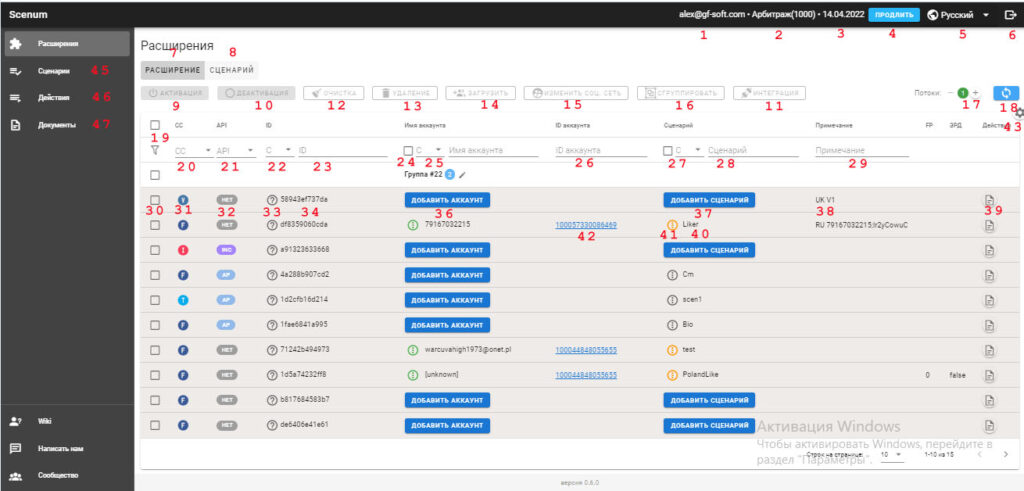
The main page of the Scenum service includes all the elements for operational control over the work of accounts. Let's go through each element.
Top information menu.
1 – shows the account of the owner of the personal account
2 – shows the current tariff plan
3 – shows the date, to which the current tariff is valid
4 – link to renew the tariff plan
5 – selector for selecting the interface language
6 – button to log out of personal account
Left menu
By default, the personal account at the entrance is displayed in the Section – Extensions
45 – Scenarios menu, in this section you can create and edit scripts
46 – Action section, in this section you can create and edit actions
47 – section Documents, in this section you can add documents (txt or pictures) or edit existing
Control mode switch multitasking
7 – The default is control mode “Extensions”. In this case, you can control functions in relation to extensions (9,10,11,12,13,14,15,16) for selected extensions.
8 – script control mode. In this mode, you can manage scripts in the selected extensions.
Group functions for managing extensions
9 – dedicated extensions activation function. If the extension was previously deactivated, using this function, you can activate the extension for further work with it.
10 – function to deactivate selected extensions. If for some reason you do not need the extension at the moment, and you want, so that it does not take up space in your tariff. You can deactivate it. And activate later (function 9)
12 – extension cleaning function. This function clears the expansion slot to its original state.
13 – remove extensions function. This function removes the selected extensions.
14 – function of bulk loading of accounts into extensions. With this function, you can load the list of accounts in the form of a login / password or using cookies.
Download formats can be as follows:
15 – social network extension mass change function.
16 – grouping / ungrouping function of extensions. You can combine extensions into a group and apply group policies for more convenient work.
Flow control
17 – number of threads switch. Using it, you can specify in how many threads the scripts will be executed simultaneously.
When setting the quantity, you must understand, that each thread spends computer resources for its work, even if you just open a browser with a blank page or a multi-browser profile. So you have to consider this.
There are schemes of work, in which the load is evenly distributed and this leads to maximum efficiency in work.
Schemes for working with streams are described in detail in our blog article..
Cabinet refresh button
18 – cabinet update button. Using this button, you can update the home page of your personal account without a full update using browser tools.
Filter and sort area
19 – checkbox for selecting all accounts on this page
20 – filtering and sorting by social network. Specifying the type of social network, you can set only its display
21 – filtering and sorting by integration with a multi-browser.
22,23 – filtering and sorting by internal ID of the extension (id and status)
24,25 – filtering and sorting by account (Availability, login and status)
26 – filtering and sorting by account id / username
27,28 – filtering and sorting by script (Availability, name and status)
29 – filtering and sorting by comment
Extension string(connectivity)
30 – checkbox for single selection of the extension line
31 – social network switch extension. The concept of the service is based on working with action sets for social networks and other sites.. Therefore, it is necessary to designate in which social network you will work within the framework of this extension. (connectivity). If you indicate Facebook, then you will only be shown Facebook and general features.
32 – multi-browser integration switch. You can set up automatic opening of profiles in multi-browsers (what do they envisage). This will save you time and computer resources..
33 – expansion status. Exists 3 extension status (connectivity):
– Gray – inactive extension. It means, what's the connection with the browser, where the extension is installed is missing. Most likely the browser is closed or problems with proxies.
– green – active expansion. With this status, you can fully work with this extension..
– Red – extension deactivated. If for some reason you do not need the extension at the moment, and you want, so that it does not take up space in your tariff. You can deactivate it (function 10). And activate later (function 9)
34 – internal extension id (connectivity). This is a service parameter. Usually it is needed to find out the reasons for failures when working with service support..
35 – group of accounts. When grouping accounts, a group with a standard name appears (you can change it, clicking on the pencil next to the title).
36 – add account button. In the initial state, the Add account button is displayed.
37 – add script button. In the initial state, the Add Script button is displayed.
38 – note field. For convenience, you can add a note to your accounts and filter / sort by this field.
39 – work event log button. When you open the journal, you can watch the progress of the work done by your account.
40 – script control field. In this field you can assign a script for the extension, start it and stop it.
41 – script status. There are several statuses of the script:
– Gray – waiting for browser / unknown
– green – launched
– Red – error
– Orange – stopped / completed
– yellow – break
– blue – waiting in line (no free flow)
42 – account id / username. It appears upon successful account authorization. When you click on it, a browser tab opens with this account.